
Today I have a very simple application for you to demonstrate how to use profiles to control environmental variables.
To skip the build and access the code, you can find it here:
https://github.com/suveerprithipal/spring_properties_and_profiles
Lets keep going.
Why do we want this?
So we can swap profiles when testing locally vs a cloud or dev vs test
How do we build this?
Firstly, we need to create an environmental variable. To do so, on windows10,
On windows desktop, Search for “advanced system settings”

Select ‘Advanced system settings’

- Click Environment Variable
- Click “New” under ‘System Variables’
- Set Variable name of ‘APP_URL’
- Set Variable value of ‘cloud’

Next up I created a Maven project and added in my Spring boot dependencies. We then need to create some profiles. Easy peasy. To do so, we actually create properties files. Yep, that simple. Under your java/test filepath, create a resources dir. Remember to right click and mark as ‘test Resources Root’ Create 2 properties files:
- properties-local.properites
- properties-cloud.properties

In each of them, add a variable called ‘my.app.url’ as the following demonstrates.
in properties-local.properites: my.app.url = local

in properties-cloud.properites: my.app.url = ${app_url}
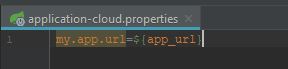
We use “${app_url}” here as we want to point our test to use the system variable we created. When springboot runs, and see’s “${}” it knows to go looking for a definition on that variable on the system.
We’re almost done! and now in a position to add some tests to access these variables we’ve created above.. Create a test or use the one created by default if you have one.
In our test class, create a class member of type ‘Environment'(org.springframework.core.env.Environment). I called mine “env”. Don’t forget to Autowire(org.springframework.beans.factory.annotation.Autowired) this member as we want a bean created for this at run-time.
We create 2 tests:
- localTest
- cloudTest
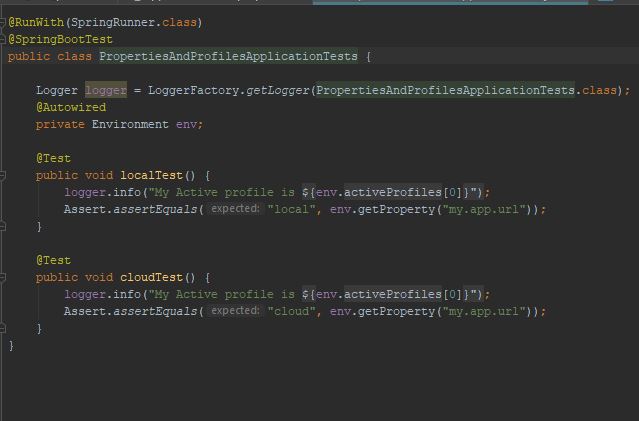
These are very similar in nature, but have 2 different asserts:
- localTest Assert.assertEquals(“local”, env.getProperty(“my.app.url”));
- cloudTest Assert.assertEquals(“cloud”, env.getProperty(“my.app.url”));
Lastly, we want to specify which profile spring should use when running. To do this, we will add a VM Option to the Run Configuration.
I ran my 2 tests above individually. This create a run configuration for me automatically. I then go to edit these configs.
- localTest Run config: I set the VM option to : -Dspring.profiles.active=local Apply and save.
- cloudTest Run config: I set the VM option to : -Dspring.profiles.active=cloud Apply and save.

Now when we run these, spring will swap out our properties file, based on the profile we selected. You will see that the local env.getProperty will return “local” and cloud env.getProperty will return cloud, which we set on the system.
That’s it! You’re done! Happy Testing.
