Its really important to define our work flow, our outputs and responsibilities within our team
When testing full stack, we need to apply QA at all levels of our engagement.

Its really important to define our work flow, our outputs and responsibilities within our team
When testing full stack, we need to apply QA at all levels of our engagement.
Templates are a great way to ensure consistency and create visibility within your teams.
We want a repeatable transparent pattern for our teams to be comfortable with and ultimately, own.
Here is an example of a template I have used:
Define your DOR
Define your ACs

Try and outlines some Use cases:

Have a section to describe high level test cases:

Define your definition of Done and Key Tasks


Cypress is great for front end mocking. Its purpose built for this with Promises in mind.Most commonly, cy.intercept is used for this.Eg.:cy.intercept(‘POST’, ‘/your-backend-api’, {}).as(‘backendAPI’);
cy.wait('@backendAPI').then(xhr => {

  expect(xhr.response.statusCode).to.equal(404);
});
Cypress Documentation
Network Requests | Cypress Documentation
What you’ll learn How Cypress enables you to stub out the back end with cy.intercept() What tradeoffs we make when we stub our network requests.
https://docs.cypress.io/guides/guides/network-requests
Examples for GraphQL
Cypress Documentation
Working with GraphQL | Cypress Documentation
What you’ll learn Best practices to alias multiple GraphQL queries or mutations for a group of tests. Overriding an existing intercept to modify…
https://docs.cypress.io/guides/testing-strategies/working-with-graphql
Unit Testing
For an example in .net, we can rely on something like Nunit combined wth Rest Sharp to get our GraphQL service tested.
Rest sharp is really just an option for us to make that REST call
you can use any other
Nunit, its just our assertion library, you can use any other here as well
Java based?
Well using RestTemplates and Junit would do great as basic tools.
Using Native GraphQL
Its best to try and work directly with these components.
https://www.graphql-tools.com/docs/mocking
https://graphql.org/blog/mocking-with-graphql/

‘Test infrastructure as code’ should really be part of your Test Strategy or testing game plan for the lack of one.
From experience working with docker and kubernetes, the top benefits for have been:
– easily manage the setup of Ci jobs,
– changes can be tracked and become the single source of truth,
– easily deploy test automation tooling such as selenium and pact infrastructure,
– manage Cloud costs effectively,
– setup and tear down Jenkins nodes with ease,
– easily chain jobs and share volumes if needed,
– deploying across regions, teams and environments are a breeze,
– setting up end to end development and test tooling for manual testing becomes quicker.
#automation #cloud #testing #jenkins #aws #azure #cicd #kubernetes #docker
To maximise your efficiencies as a test automation engineer, define a solid approach and plan out your test development workflow.
Below, I’ve developed a system for you to follow in building your test automation cases

I invite you to follow the same path or adapt it to meet your teams requirements.
Its good practice to follow a system and with repeatable goals defined. This will make you a stronger but also adaptable tester. Good luck!
This is an example for a /users endpoint:
Identify the API implantation and variants :
| GET /users | List all users |
| GET /users?name={username} | Get user by username |
| GET /users/{id} | Get user by ID |
| GET /users/{id}/configurations | Get all configurations for user |
| POST /users/{id}/configurations | Create a new configuration for user |
| DELETE /users/{id}/configurations/{id} | Delete configuration for user |
| PATCH /users/{id}/configuration/{id} | Update configuration for user |
| Name | Verb | How | HTTP Response Code | Assertion |
| should return a list of X resources | GET | Call endpoint | 200 | Count property should match rows.length, Count must be greater than 1 |
| should filters resources | GET | Call endpoint with filter parameters (limit, sort, start, filter) | 200 | Count property, rows.length, id of first and last resource |
| should return a specific resource | GET | Call endpoint with a resource ID | 200 | Check each property |
| should return a 404 if resource not found | GET | Call endpoint with a fake resource ID | 404 | |
| should create a resource | POST | Send full valid data | 201 | Check each property |
| should fail returning all mandatory properties | POST | Send a single non mandatory property | 400 | Count number of errors |
| should fail if … | POST | “Send data against business logic (null value, blank value, unicity, shorter than expected, bad relation …)” | 400 | Check reason/code of error |
| should update the resource | PATCH | Send full valid data (set a property id which should be ignored) | 200 | Check each property |
| should fail if … | PATCH | “Send data against business logic (null value, blank value, unicity, shorter than expected, bad relation …)” | 200 | Check reason/code of error |
| should return a 404 if resource not found | PATCH | Call endpoint with a fake resource ID and send full valid data | 404 | |
| should delete the resource | DELETE | Call endpoint with a resource ID | 204 | If hard delete, check if the resource doesn’t exist anymore in DB. If soft delete, check the resource has a deletedAt value not null |
| should delete the resource | DELETE | Call endpoint with a fake resource ID | 204 |
Where {id} is a UUID, and all GET endpoints allow optional query parameters filter, sort, skip and limit for filtering, sorting, and pagination.
| # | Test Scenario Category | Test Action Category | Test Action Description |
|---|---|---|---|
| 1 | Basic positive tests (happy paths) | ||
| Execute API call with valid required parameters | Validate status code: | 1. All requests should return 2XX HTTP status code 2. Returned status code is according to spec: – 200 OK for GET requests – 201 for POST or PUT requests creating a new resource – 200, 202, or 204 for a DELETE operation and so on | |
| Validate payload: | 1. Response is a well-formed JSON object 2. Response structure is according to data model (schema validation: field names and field types are as expected, including nested objects; field values are as expected; non-nullable fields are not null, etc.) | ||
| Validate state: | 1. For GET requests, verify there is NO STATE CHANGE in the system (idempotence) 2. For POST, DELETE, PATCH, PUT operations – Ensure action has been performed correctly in the system by: – Performing appropriate GET request and inspecting response – Refreshing the UI in the web application and verifying new state (only applicable to manual testing) | ||
| Validate headers: | Verify that HTTP headers are as expected, including content-type, connection, cache-control, expires, access-control-allow-origin, keep-alive, HSTS and other standard header fields – according to spec. Verify that information is NOT leaked via headers (e.g. X-Powered-By header is not sent to user). | ||
| Performance sanity: | Response is received in a timely manner (within reasonable expected time) – as defined in the test plan. | ||
| 2 | Positive + optional parameters | ||
| Execute API call with valid required parameters AND valid optional parameters Run same tests as in #1, this time including the endpoint’s optional parameters (e.g., filter, sort, limit, skip, etc.) | |||
| Validate status code: | As in #1 | ||
| Validate payload: | Verify response structure and content as in #1. In addition, check the following parameters: – filter: ensure the response is filtered on the specified value. – sort: specify field on which to sort, test ascending and descending options. Ensure the response is sorted according to selected field and sort direction. – skip: ensure the specified number of results from the start of the dataset is skipped – limit: ensure dataset size is bounded by specified limit. – limit + skip: Test pagination Check combinations of all optional fields (fields + sort + limit + skip) and verify expected response. | ||
| Validate state: | As in #1 | ||
| Validate headers: | As in #1 | ||
| Performance sanity: | As in #1 | ||
| 3 | Negative testing – valid input | ||
| Execute API calls with valid input that attempts illegal operations. i.e.: – Attempting to create a resource with a name that already exists (e.g., user configuration with the same name) – Attempting to delete a resource that doesn’t exist (e.g., user configuration with no such ID) – Attempting to update a resource with illegal valid data (e.g., rename a configuration to an existing name) – Attempting illegal operation (e.g., delete a user configuration without permission.) And so forth. | |||
| Validate status code: | 1. Verify that an erroneous HTTP status code is sent (NOT 2XX) 2. Verify that the HTTP status code is in accordance with error case as defined in spec | ||
| Validate payload: | 1. Verify that error response is received 2. Verify that error format is according to spec. e.g., error is a valid JSON object or a plain string (as defined in spec) 3. Verify that there is a clear, descriptive error message/description field 4. Verify error description is correct for this error case and in accordance with spec | ||
| Validate headers: | As in #1 | ||
| Performance sanity: | Ensure error is received in a timely manner (within reasonable expected time) | ||
| 4 | Negative testing – invalid input | ||
| Execute API calls with invalid input, e.g.: – Missing or invalid authorization token – Missing required parameters – Invalid value for endpoint parameters, e.g.: – Invalid UUID in path or query parameters – Payload with invalid model (violates schema) – Payload with incomplete model (missing fields or required nested entities) – Invalid values in nested entity fields – Invalid values in HTTP headers – Unsupported methods for endpoints And so on. | |||
| Validate status code: | As in #1 | ||
| Validate payload: | As in #1 | ||
| Validate headers: | As in #1 | ||
| Performance sanity: | As in #1 | ||
| 5 | Destructive testing | ||
| Intentionally attempt to fail the API to check its robustness: Malformed content in request Wrong content-type in payload Content with wrong structure Overflow parameter values. E.g.: – Attempt to create a user configuration with a title longer than 200 characters – Attempt to GET a user with invalid UUID which is 1000 characters long – Overflow payload – huge JSON in request body Boundary value testing Empty payloads Empty sub-objects in payload Illegal characters in parameters or payload Using incorrect HTTP headers (e.g. Content-Type) Small concurrency tests – concurrent API calls that write to the same resources (DELETE + PATCH, etc.) Other exploratory testing | |||
| Validate status code: | As in #3. API should fail gracefully. | ||
| Validate payload: Validate headers: | As in #3. API should fail gracefully. As in #3. API should fail gracefully. | ||
| Performance sanity: | As in #3. API should fail gracefully. |
So, there you are… having a UI and an entire suite of manual test cases. These tests are tedious, take forever and lets be honest…can get repetitive and boring!
My friend, you are in the frontline for automating your testing!
Lets not beat around the bush – Selenium has been around for ages. The product has had millions of users, has become a W3 standard and is launching selenium 4 pretty soon.
This is the tool for us.
There are others yes, most of which will wrap some selenium WebDriver capability into a pretty package and sell you that at a pretty penny.
Lets not get the wool pull over our eyes.
We can do the same, implement at the same level and in fact, have far greater control on our test product ….cheaper, faster, better.
Ok, before we get butterflies in our tummies over this tool, there are some pitfalls…urhgggg, of course.
Not to worry, we have help – in our demo below, I will show you how I implemented Selenide – an open source project to fill the gaps that were obvious in Selenium 3.
You can read up on the tools here:
Selenium
https://selenium.dev/downloads/
Selenide
A wrapper around selenium with a few more fluent apis for us to work with. therefore, it is my. preferred library.
Head on over to my github page and you will find a FEW implementations of UI testing,
https://github.com/suveerprithipal to find this code and more. Dont limit yourself. There are many ways of implementing this.
Here is one I’ve taken from https://github.com/suveerprithipal/selenideJava which implements Selenide.
https://github.com/suveerprithipal/selenideJava/blob/master/README.md
 * @author Suveer Prithipal

public class GoogleTest {
  @Test
  public void googlePageTest(){
    /**
      No need to create a webdriver instance!
      Selenide provides with easy to use API's that provide rich functionality.
      On a normal day with selenium, we would need to create a webdriver instance, and bind it to a browser.
      We would also need to define page elements to use them.
      Selenide removes the need to do this by wrapping up that into a singe API.
      Below, we use "open" to create the webdriver instance, and bind it to a class.
      Passing it a class, provides the shape for the instance, giving it methods and defined functionality.
     */
    GooglePage googlePage = open("http://www.google.com",GooglePage.class);


    /**
      Now that we have an instance of webdriver up and we are on our test app, Google.
      We can then search something.
      Searching for something means it will return a result.
      Therefore, we need a class to take the shape of these results.
     */
    SearchResultsPage searchResultsPage = googlePage.searchGoogle("selenide");


    /**
    Tests.
    Now that we have results, we can perform tests.
    Below, we use the searchResultsPage and query the class for expected results.
     */
    searchResultsPage.checkResultsSize(8);
    searchResultsPage.getResults().get(0).shouldHave(text("Selenide: concise UI tests in Java"));


    /**
    Use page object models and design patterns
    This example is to demo the ease of use with Selenide.
    Its important to separate out your implementation for better maintenance, easy of reading and debugging.
     */
  }

}This project is written in Java, uses the page object model and is triggered by a BDD Cucumber feature file. Learn these terms well.
Lets get into it:
The things you want to interact with on a page like:
Step definitions are the glue that will bring a workflow to your elements and bind them your feature file.
Here we chain our actions together and feed them input using our feature file.
Eg, the loginCuke() method:
Feature files are BDD scribed tests.
We write these in plain english and translate that to code…as we did above
Thats it! run your feature file and wait for the results.
You’ll see the browser opening and doing things. Screenshots are a default on failure with Selenide so you’ll have that too!
Reporting is a must in any project. Please have a look at my other content for more details or pursue your own.
UI testing has been around for a while and is getting easier, cheaper and simpler to implement.
With the older versions selenium we had to code a lot to get a page to open, while today we can achieve this in 1 line with a very fluent api.
Write once, test 1000 times on all browsers
our tools allow us to test on all browsers and any version…. simultaneously.
A bless in the UI testing world as it allows us to drastically reduce our testing time and therefore our cost to service testing.
Writing our own frameworks gives us greater advantage in scale and capability.
Nothing is more fore-filling than overcoming a challenge by learning, trying and failing!

Having automated tests are great! … but not sharing the results or centralizing them is not so great. 😦
Your automated tests have undeniable business value, don’t be shy about it. Excellence does not happen overnight. So even if your tests are in early development, share the results with your team.
So what can you do?
In conclusion:
Visibility and Reliability are really important. This makes them trust worthy, needed… valuable.
Pursue it viciously. Take small incremental steps towards implementation.
Ola! Thanks for popping in and having a squiz
Today I’ll like to showcase how we can make our browser based test faster and more efficient by making use of
Docker is a great resource to use as we have the ability to spin up and environment for testing and then very quickly throw it away again.
OMG why would you do that?
Well that the power and presence of docker and containers. We can spin up, tear down and re-use this resource multiple times and we should do so, without attachment,
Docker support is amazing. there are heaps of predefined containers that just require us to pull and use instead of us having to write and maintain those scripts, environments and data.
Its like magic at your fingertips

Grid is an extension out from Selenium which give us the ability to run our tests remotely.
Lets look at some of the key benefits:
We’ll make use of the predefined selenium-docker containers.
This setup makes use of a dockerfile which will spin up 3 environments:
Pull the image from: https://github.com/SeleniumHQ/docker-selenium
Head on into your download dir and docker-compose up, you will see the following:

What we want to look out for:
Navigate to the grid:
In your browser, open up: http://localhost:4444/grid/console
You will see:-
You are viewing the grid, and the child worker nodes it has available.

Thats it! your grid is up and running –
how damn easy was that!
But we’re not done. We need to change our test application code to hit this new environment.
To open the browser we need to establish some browser capabilities to start up our browser.
These are seen as ChromeOptions(),
We need to apply these setttings so that we can start up a browser on a linux terminal with no display adapter. We set the headless option in particular for this.
We then need to point our RemoteWebDriver to the new url,
We do so by setting the urlToRemoteWD variable, which point to the url of the grid.

When we run our test, –
Our test is published to the master
The master will inspect which node is free and available and will push the test to run there.
The results are fed back to the master and then fed back to our test application for reporting.
You are ALL DONE and ready to run a battery of tests against AWS or locally, headed or headless.


No. Not that type of ref card!
Pictured above is Mike Dean, a familiar face for those English PL football lovers.
Its been a while since we life’d per normal and I jabbered on about something. Certainly for me personally, it’s been an experience of all sorts.
Thankfully though, it has not been a difficult one and I hope the same for you.
With that, let’s get to it.
Today, it can be no surprise to you that Orion is moving into the container world at speed.
When I think containers, I think Micro-Services and when I think micro-services I think APIs.

Compared to traditional test automation, API testing is so much

When working with APIs, we have 4 main(but not limited to) sections that we would work with.
The endpoint is the actual URL under test. This is your gateway to access the information under test.
With any System under test. knowing what you’re putting in is super important as these should build the foundation of your test cases.
Most things in life come with info that isn’t really for you. This can be applied to phone calls, emails, dinner chats and even our APIs.
Meta is built into the header of your API. Sometimes this information is handy to you or set by the developers. working with headers is a need today
as most Auth services will embed a token in the header of the API.
Of course, no touching if you’re not allowed. Auth is a MUST test, must know must can do.
And last but not least, our apple… the payload.
The payload is the carrier of data, messages and usually all things requested by the consumer.
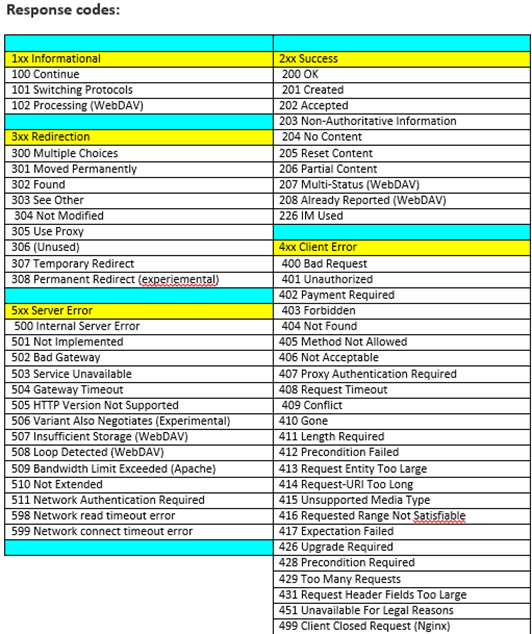
APis communicate over HTTP but do so using different methods and with any form of communication some feedback is always nice.
Apis too respond in various manner depending on circumstance.
Below is a table that represents that response code and the meaning behind it. Get familiar with these as you’ll see them quite often.
Api Testing lends itself quite easily to being structured, well documented and fast to implement.
There are heaps of tools to be used and the benefits of testing repeatedly can be seen quick.
